A broken radiator drain plug is one of the most common problems that car owners face. If you’re in this situation, you may be wondering how to remove it without damaging your car. The good news is that there are several easy steps that you can take to remove a broken radiator drain plug quickly and easily. In this post, we’ll share 7 simple steps that you can follow to remove a broken radiator drain plug from your car. We’ll cover everything from the tools you need to use to the best techniques to get the job done right. So, if you’re struggling with a broken radiator drain plug, read on and learn how to fix it in just a few easy steps!
Introduction to radiator drain plugs and their importance
Radiator drain plugs may seem like small and insignificant components, but they play a crucial role in the overall functioning of your vehicle’s cooling system. These plugs are designed to allow for the easy draining of coolant from the radiator, making essential maintenance tasks such as flushing and replacing coolant a breeze.
The importance of radiator drain plugs cannot be overstated. Over time, coolant can become contaminated with debris, rust, and other impurities that can hinder its ability to effectively cool the engine. Regularly draining and replacing coolant helps to maintain optimal engine temperature, prevent overheating, and extend the lifespan of your radiator.
However, despite their importance, radiator drain plugs can sometimes become damaged or broken due to various reasons such as corrosion, overtightening, or accidental mishaps. Dealing with a broken drain plug can be frustrating, but fear not! In this guide, we will walk you through seven easy steps to remove a broken radiator drain plug and get your cooling system back in working order.
By following these steps, you can save yourself the hassle and expense of bringing your vehicle to a mechanic and tackle this repair yourself. So, let’s dive in and learn how to remove a broken radiator drain plug efficiently and effectively.
Step 1: Gather the necessary tools and materials
Before you begin removing a broken radiator drain plug, it is crucial to gather all the necessary tools and materials to ensure a smooth and efficient process. Having everything on hand will save you time and frustration.
Here are the tools and materials you will need for this task:
- Safety Gear: It’s always important to prioritize your safety when working with any automotive components. Wear protective gloves, safety glasses, and coveralls to protect yourself from any potential harm.
- Replacement Drain Plug: Before removing the broken drain plug, make sure you have a replacement plug ready. This will prevent any delays or complications when it comes time to reassemble the radiator.
- Pliers or Vice Grips: These tools will come in handy when dealing with a broken drain plug. They will provide the necessary grip and leverage to remove the broken piece effectively.
- Adjustable Wrench or Socket Set: Depending on the type of drain plug and its size, you may need an adjustable wrench or a socket set. These tools will allow you to loosen and remove the drain plug securely.
- Penetrating Oil: If the drain plug is stubborn and difficult to remove, applying a penetrating oil like WD-40 can help loosen it. Spray the oil onto the plug and allow it to penetrate for a few minutes before attempting to remove it.
- Drain Pan: To catch any coolant that may spill during the removal process, place a drain pan or bucket underneath the radiator. This will help prevent any mess and make it easier to dispose of the coolant properly.
- Clean Rag or Towel: Keep a clean rag or towel nearby to wipe any spills or excess coolant that may occur during the removal process. This will help keep your workspace clean and prevent any accidents caused by slippery surfaces.
By gathering these tools and materials beforehand, you will be well-prepared to tackle the task of removing a broken radiator drain plug. This will ensure a smoother experience and increase your chances of success in completing the repair efficiently.
Step 2: Prepare your work area
Before you begin removing the broken radiator drain plug, it is crucial to prepare your work area properly. By taking a few simple steps, you can ensure a clean and organized workspace, making the task at hand much easier and more efficient.
Firstly, locate a suitable area to work on your vehicle. Ideally, this should be a well-ventilated space, preferably outdoors or in a garage with proper ventilation. This will help prevent any harmful fumes or chemicals from accumulating in a confined space.
Next, gather all the necessary tools and equipment you will need for the job. This may include a set of wrenches or pliers, a drain pan to catch any coolant that may leak, safety glasses or goggles, gloves, and a clean cloth or rag to wipe up any spills or messes.
It is also important to ensure that the vehicle is parked on a level surface and that the engine is completely cool before you begin. This will help prevent any accidents or injuries that may occur due to hot coolant or moving parts.
Once you have prepared your work area and gathered all the necessary tools, you are ready to move on to the next step in removing the broken radiator drain plug. Taking the time to properly set up your work area will not only make the process smoother but also help ensure your safety throughout the task.
Step 3: Locate the radiator drain plug
Locating the radiator drain plug is a crucial step in removing a broken radiator drain plug. The drain plug is typically located at the bottom of the radiator and is designed to allow coolant to be drained from the system. Finding the drain plug may vary depending on the make and model of your vehicle, so referring to your car’s manual is highly recommended.
To locate the drain plug, you will need to access the underside of the radiator. This may require lifting the vehicle or removing certain parts to gain proper access. Once you have a clear view of the radiator, look for a small valve or plug near the bottom.
In most cases, the drain plug will be made of plastic or metal and may have a hexagonal shape, making it easier to loosen with a wrench or pliers. It is essential to ensure the engine is cool before attempting to remove the drain plug to avoid any burns or injuries.
If you are unsure about the exact location of the drain plug, you can consult online forums or watch tutorial videos specific to your vehicle model. These resources can provide visual guidance and tips on how to easily locate the drain plug.
Once you have successfully located the radiator drain plug, you are ready to proceed to the next step of removing the broken plug and completing the repair process. Remember to exercise caution and take your time during this step to avoid causing any further damage to your radiator.
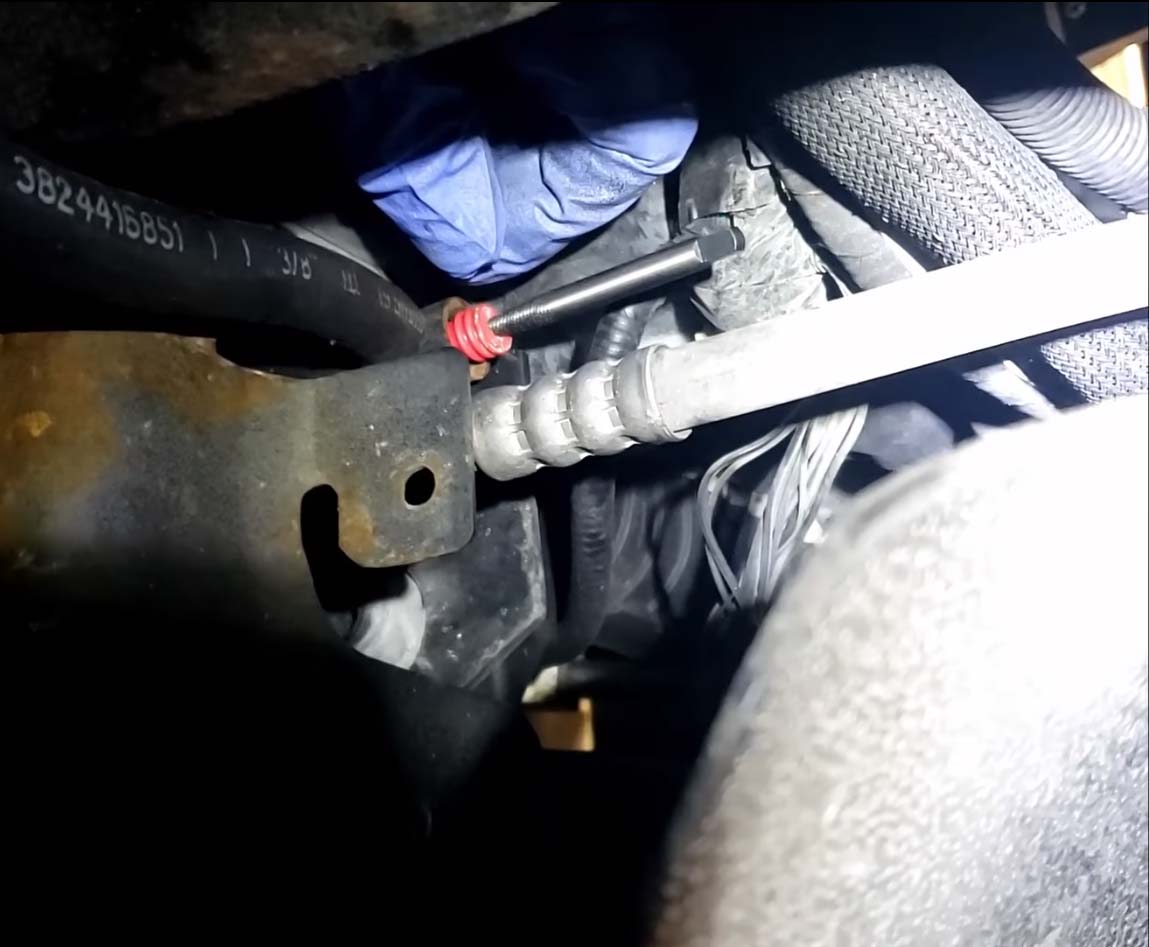
Step 4: Use the appropriate tool to remove the broken drain plug
Once you have prepared your workspace and gathered the necessary materials, it’s time to tackle the broken radiator drain plug. Step 4 involves using the appropriate tool to remove the broken plug, ensuring a successful extraction process.
Before starting, it’s important to identify the type of drain plug you are dealing with. Radiator drain plugs can vary in design and may require different tools for removal. Common types include hex key plugs, square plugs, or slotted plugs.
Once you have determined the type of drain plug, select the appropriate tool. For hex key plugs, a hex key wrench or socket set will be needed. Square plugs may require a square head wrench or a pair of pliers. Slotted plugs can often be removed with a flathead screwdriver.
Align your chosen tool with the broken drain plug, ensuring a secure and snug fit. Apply gentle pressure to loosen the plug, turning it counterclockwise. Be cautious not to apply excessive force as this can further damage the plug or surrounding components.
If the drain plug proves stubborn and refuses to budge, you may need to apply some additional techniques. For example, you can try using penetrating oil to loosen any rust or debris that may be causing friction. Allow the oil to sit for a few minutes before attempting to remove the plug again.
In some cases, a broken drain plug may be stripped or too damaged to be removed using conventional methods. If this occurs, it may be necessary to seek professional assistance or consult a radiator repair specialist.
Remember, patience and careful handling are essential during this step. Take your time and proceed with caution to successfully remove the broken radiator drain plug.
Step 5: Clean the area and inspect for any damage
After successfully removing the broken radiator drain plug, it’s important to take a moment to clean the surrounding area and inspect for any potential damage. This step ensures that your radiator is in good condition and ready for the installation of a new drain plug.
Start by cleaning the area around the drain hole with a mild detergent and a clean cloth. This will remove any dirt, grime, or coolant residue that may have accumulated over time. Cleanliness is crucial as it helps prevent any contaminants from entering the radiator once the new drain plug is installed.
Once the area is clean, carefully inspect the radiator for any signs of damage. Look for cracks, leaks, or other abnormalities that may have been caused by the broken drain plug. If you notice any issues, it’s important to address them before proceeding further. Depending on the severity of the damage, you may need to consult a professional or consider replacing the radiator altogether.
If everything looks good, you can proceed with the installation of a new drain plug. Ensure that the new plug is of the correct size and compatible with your radiator. Apply a small amount of thread sealant or Teflon tape to the threads of the plug to ensure a snug and leak-free fit.
Taking the time to clean the area and inspect for any damage will not only ensure the proper functioning of your radiator but also prevent any future complications. It’s always better to be thorough and address any potential issues early on, as this will save you time, money, and hassle in the long run.
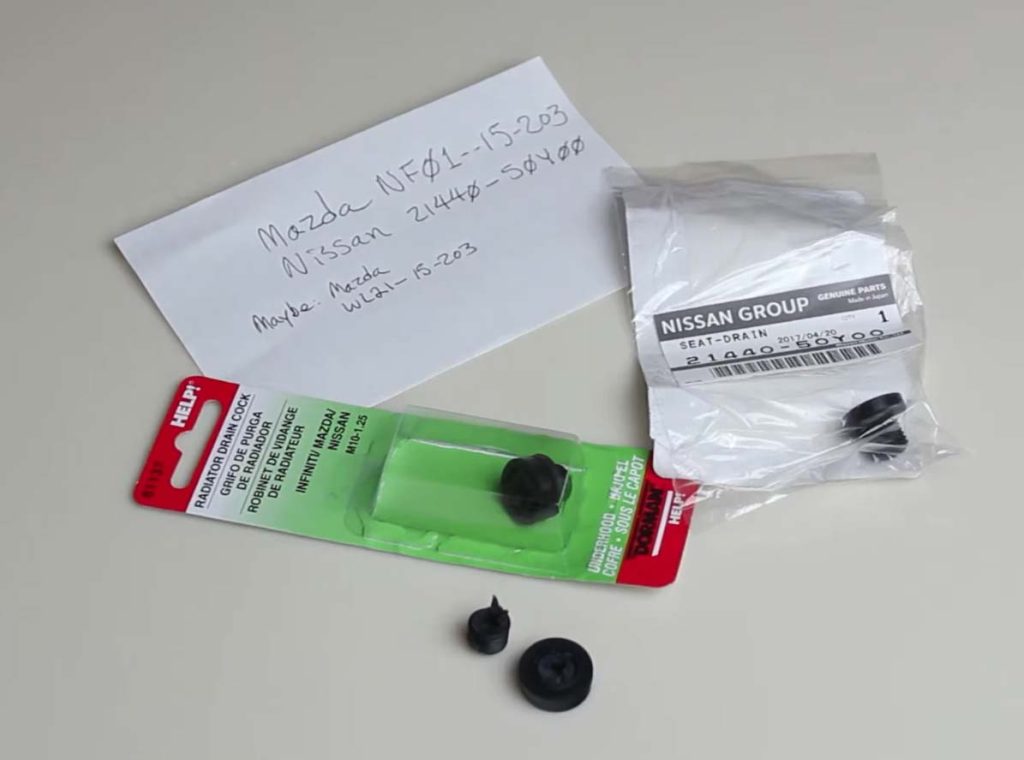
Step 6: Install the new drain plug or alternative solution
Now that you’ve successfully removed the broken radiator drain plug, it’s time to install a new one or explore alternative solutions. Depending on the extent of the damage or your personal preference, you have a few options.
If you have a replacement drain plug available, carefully thread it into the drain hole. Ensure it is securely tightened, but be cautious not to overtighten as it may cause damage to the radiator. Double-check for any leaks or drips around the drain plug area.
Alternatively, if you don’t have a replacement drain plug or want to explore other options, you can use a rubber plug or a drain plug repair kit. Rubber plugs are readily available at most auto parts stores and can be inserted into the drain hole to create a temporary seal. Ensure the rubber plug is securely in place before proceeding.
Another option is to use a drain plug repair kit, which typically includes an adhesive or epoxy-based compound. Follow the instructions provided with the kit to apply the compound to the drain hole and create a new seal. Allow sufficient time for the compound to cure before adding coolant or water to the radiator.
Regardless of the method you choose, it is essential to test for leaks thoroughly. Start by filling the radiator with coolant or water and monitor closely for any signs of leakage around the drain plug area. If you notice any leaks, tighten the drain plug or reapply the repair solution as needed.
Remember, it’s crucial to address the issue promptly to prevent further damage to your radiator and ensure optimal cooling system performance. If you’re unsure or uncomfortable with the process, it’s always recommended to consult a professional mechanic for assistance.
Step 7: Refill the radiator with coolant and test for leaks
After successfully removing the broken radiator drain plug, it’s time to move on to the final step – refilling the radiator with coolant and testing for any potential leaks. This step is crucial to ensure that your radiator is functioning properly and ready to keep your engine cool.
To begin, locate the radiator fill cap. It is usually located on top of the radiator or the coolant reservoir. Remove the cap and set it aside in a safe place.
Next, grab a bottle or jug of the appropriate coolant for your vehicle. Slowly pour the coolant into the radiator or coolant reservoir until it reaches the recommended level indicated by the manufacturer. Be mindful not to overfill, as this can cause overflow or other issues.
Once you’ve filled the radiator, it’s time to test for leaks. Start the engine and let it run for a few minutes, allowing the coolant to circulate throughout the system. Keep a close eye on the radiator and surrounding areas for any signs of leakage, such as drips or puddles forming.
Additionally, pay attention to the temperature gauge on your dashboard. It should remain within the normal range. If it starts to rise unusually high, it may indicate a problem with the cooling system, and further inspection is needed.
If you don’t notice any leaks and the temperature remains stable, you’re on the right track. However, it’s always a good idea to recheck for leaks after a few days of regular driving, as some issues may only become apparent under certain conditions.
Finally, once you’ve confirmed that there are no leaks and the temperature is under control, securely fasten the radiator fill cap back in place. Double-check that it is tightened properly to prevent any coolant from escaping.
By following these simple steps, you can confidently refill your radiator with coolant and test for leaks after removing a broken drain plug. Regular maintenance and attention to your vehicle’s cooling system will help keep your engine running smoothly and prevent any potential overheating issues.
Tips and precautions for removing a broken drain plug
Removing a broken radiator drain plug can be a challenging task, but with the right tips and precautions, it can be done successfully. Here are some helpful suggestions to ensure a smooth removal process without causing further damage:
- Safety first: Before attempting any repairs or removals, make sure the engine is completely cool. This will prevent any risk of burns from hot coolant or steam.
- Gather the necessary tools: You will need a set of pliers or a wrench, a lubricant such as penetrating oil or WD-40, and a replacement drain plug.
- Spray with lubricant: Apply a generous amount of lubricant to the broken drain plug. This will help loosen any rust or debris that may be causing it to stick.
- Use the right tool: Depending on the type of drain plug, choose the appropriate tool to grip and turn it. Pliers or an adjustable wrench are commonly used for this purpose. Be sure to grip it firmly to avoid slipping and causing further damage.
- Apply gradual force: Start by applying gentle pressure to the drain plug, trying to turn it counterclockwise. If it doesn’t budge, increase the force gradually while being cautious not to exert too much pressure that may result in breaking it further.
- Heat application: If the drain plug remains stubbornly stuck, you can try applying heat to help expand the metal. Use a heat gun or a small propane torch to warm the area around the plug, but be careful not to overheat or damage surrounding components.
- Seek professional assistance if needed: If all your attempts fail or if you are unsure about proceeding further, it’s best to seek the help of a professional mechanic. They have the expertise and specialized tools to handle challenging situations like this.
Remember, patience and caution are key when dealing with a broken radiator drain plug. By following these tips and taking necessary precautions, you can increase your chances of successfully removing it without causing any additional damage to your radiator or engine.
Conclusion and final thoughts
In conclusion, removing a broken radiator drain plug may seem like a daunting task, but by following these 7 easy steps, you can successfully tackle the job and prevent further damage to your vehicle.
Remember, safety should always be your top priority. Ensure that the engine is cool before starting the removal process and take necessary precautions to avoid any injuries.
Having the right tools and a patient mindset will greatly contribute to a successful outcome. Take your time, be gentle, and avoid using excessive force when trying to loosen the broken plug.
If you encounter any difficulties or feel unsure about proceeding, it is always recommended to seek professional assistance. A qualified mechanic or automotive technician will have the expertise and experience to handle the situation effectively.
By taking the necessary steps to remove a broken radiator drain plug, you can save time and money that would otherwise be spent on a replacement or costly repairs. Regular maintenance and care for your vehicle’s cooling system will help prevent future issues and ensure the longevity of your radiator.
Remember, it’s always better to address any problems promptly rather than letting them escalate into more significant issues. Proper maintenance and attention to detail will keep your radiator functioning optimally and your vehicle running smoothly.
In conclusion, with a little patience, the right tools, and some basic know-how, removing a broken radiator drain plug can be a manageable task. By following the steps outlined in this guide, you’ll be well-equipped to handle this challenge with confidence and keep your vehicle in top shape.
We hope you found our blog post on removing a broken radiator drain plug helpful. Dealing with a broken radiator drain plug can be a frustrating and messy problem, but with the 7 easy steps we provided, you’ll be able to tackle it with confidence. Remember to take your time, follow the instructions carefully, and be cautious not to cause any further damage. With these steps, you’ll be able to successfully remove the broken plug and get your radiator back in working order in no time. Good luck, and here’s to a hassle-free radiator repair!