Your car’s brake system is one of its most important components, responsible for ensuring that you can safely stop your vehicle whenever you need to. However, over time, brake drum rust can accumulate, making it difficult for your brakes to function properly. This can lead to a dangerous situation on the road, and it is essential that you learn how to clean your brake drums to prevent this from happening. In this post, we will guide you through the process of reviving your brake system by cleaning the rust off your brake drums. We will provide you with a step-by-step guide that will help you tackle this important task on your own. By following our instructions, you can ensure that your brake system is in top condition, allowing you to drive safely and confidently.
Introduction to brake drum rust and its impact on braking performance
Brake drum rust is a common issue that can greatly impact the performance of your vehicle’s braking system. Over time, moisture and exposure to the elements can cause rust to develop on the surface of the brake drums. This rust buildup can lead to several problems, including reduced braking power, increased stopping distances, and even a loss of control while driving.
When rust forms on the brake drums, it creates an uneven surface that prevents the brake shoes from making proper contact. This results in decreased friction and compromised braking efficiency. Additionally, the rust can cause the brake shoes to wear unevenly, leading to further deterioration of the braking system.
It is crucial to address brake drum rust promptly to ensure the safety of both you and your passengers on the road. By following a step-by-step cleaning process, you can effectively revive your brake system and restore optimal braking performance.
In the upcoming sections, we will guide you through the necessary steps to clean and remove rust from your brake drums. From gathering the required tools and materials to the detailed cleaning process, we will provide you with all the information you need to undertake this task confidently.
Remember, regular maintenance and cleaning of your brake system are essential for safe and reliable vehicle operation. By addressing brake drum rust proactively, you can ensure that your brakes operate at their best, providing you with the peace of mind you deserve while driving. So let’s dive into the step-by-step process and revive your brake system to its full potential.
Importance of regular brake maintenance and inspections
Regular brake maintenance and inspections are of utmost importance when it comes to the safety and performance of your vehicle. The brake system is a critical component that ensures you can slow down and stop your vehicle effectively, preventing accidents and potential injuries.
Over time, brake components can accumulate rust and debris, particularly in the brake drum. This rust can negatively impact the overall performance of your brakes, leading to reduced stopping power, noisy braking, and even brake failure in extreme cases. That is why it is crucial to incorporate regular brake maintenance and inspections into your vehicle care routine.
By conducting routine inspections, you can identify any signs of rust or deterioration in the brake drum early on. This allows you to take proactive measures to clean and restore the brake drum before it becomes a more significant issue. Regular maintenance also helps you catch any potential brake system problems such as worn brake pads or leaking brake fluid, which can be addressed promptly to prevent further damage.
Furthermore, regular inspections give you peace of mind knowing that your brakes are in optimal condition. Whether you are driving on busy city streets or tackling challenging terrains, you can trust that your brakes will perform efficiently when you need them the most.
Remember, neglecting brake maintenance can have severe consequences, compromising both your safety and the safety of other road users. So, make it a priority to schedule regular brake inspections and maintenance to ensure your brake system remains in top-notch condition and to avoid any potential risks on the road.
Tools and materials needed for cleaning brake drum rust
Before diving into cleaning the brake drum rust, it’s essential to gather all the necessary tools and materials. Having the right equipment on hand will ensure a smooth and effective cleaning process. Here’s a list of tools and materials you’ll need:
- Safety Gear: Start by prioritizing safety. Wear protective gloves, safety goggles, and a dust mask to shield yourself from any potential hazards during the cleaning process.
- Brake Cleaner: Invest in a high-quality brake cleaner that is specifically designed for removing rust and brake dust. Ensure that the cleaner is compatible with drum brake systems and won’t cause any damage to the brake components.
- Wire Brush: A wire brush with stiff bristles is a must-have tool for effectively scrubbing off rust from the brake drum. Look for a brush with a long handle to reach all areas of the drum easily.
- Sandpaper or Emery Cloth: Depending on the severity of the rust, you may need sandpaper or emery cloth to smooth out the drum’s surface. Opt for medium-grit sandpaper or cloth for an optimal balance of removing rust without causing excessive damage.
- Brake Adjustment Tool: In some cases, you might need a brake adjustment tool to loosen the brake shoes or adjust the drum’s position for better access during the cleaning process. Check your specific brake system requirements and have the appropriate tools ready.
- Cleaning Brushes: Different-sized cleaning brushes, such as toothbrushes or small wire brushes, can be handy for reaching tight spaces and crevices that are difficult to clean with larger tools.
- Lubricant: After cleaning the brake drum rust, you’ll need a brake lubricant to ensure smooth operation and prevent future rusting. Choose a lubricant specifically formulated for brake systems to maintain optimal performance.
- Shop Towels or Rags: Keep a supply of clean shop towels or rags nearby. These will come in handy for wiping off excess cleaner, removing rust debris, and providing a clean surface to work on.
By gathering these tools and materials beforehand, you’ll be well-prepared to tackle the task of cleaning brake drum rust effectively and efficiently, ensuring the longevity and performance of your brake system.
Step 1: Elevating the vehicle and ensuring safety
Before diving into the process of cleaning brake drum rust, it is crucial to prioritize safety and properly elevate the vehicle. This step is essential to create a safe working environment and ensure a successful cleaning process.
To begin, find a flat and level surface where you can safely park your vehicle. It is recommended to choose a location with plenty of space around the vehicle to maneuver comfortably.
Next, engage the parking brake to prevent any unintended movement while elevating the vehicle. This extra precaution adds an additional layer of safety and stability.
Once the parking brake is engaged, locate the appropriate points on your vehicle’s undercarriage to safely elevate it. Consult your vehicle’s owner manual to identify the recommended lift or jack points specific to your make and model.
Using a hydraulic floor jack or a sturdy car lift, carefully lift the vehicle off the ground. Be cautious to position the jack or lift in a stable and secure manner to prevent accidents or damage to the vehicle.
After elevating the vehicle, it is crucial to secure it in place using jack stands. These provide added stability and support, reducing the risk of the vehicle falling unexpectedly. Place the jack stands at the manufacturer-recommended points, ensuring they are firmly in position before releasing the hydraulic jack or lowering the car lift.
Once the vehicle is securely elevated and supported by jack stands, double-check that it is stable and not prone to any movement. Gently give the vehicle a slight shake to confirm its stability before proceeding.
Taking the time to properly elevate the vehicle and ensure safety is an essential first step when cleaning brake drum rust. By prioritizing safety, you create a secure working environment, allowing you to tackle the brake cleaning process with confidence and peace of mind.
Step 2: Removing the wheel and accessing the brake drum
Removing the wheel and accessing the brake drum is the crucial next step in reviving your brake system and getting rid of that stubborn rust. To begin, ensure that your vehicle is parked on a level surface and the parking brake is engaged for safety.
Start by loosening the lug nuts on the wheel using a lug wrench or a socket and ratchet. It’s important to only loosen them at this stage, as you’ll fully remove them later. This will prevent the wheel from spinning while lifting the vehicle.
Next, position a jack under the appropriate jack point of your vehicle. Consult your vehicle’s manual to locate the proper jack points. Slowly raise the vehicle until the wheel is off the ground. Place jack stands under the vehicle to provide additional support and security.
Now, you can safely remove the lug nuts completely and carefully take off the wheel. Set it aside in a safe place, ensuring it won’t roll away or cause any hazards.
With the wheel removed, the brake drum should now be fully visible. The brake drum is typically located behind the wheel and is responsible for slowing down and stopping your vehicle. It is important to note that some vehicles might have a dust cover or hubcap over the brake drum, which needs to be removed before accessing the drum itself.
Inspect the brake drum for any signs of excessive rust, debris, or damage. If there are any major cracks or deep grooves, it may be necessary to replace the brake drum entirely. However, if the rust is superficial and the drum is still in good condition, cleaning it may be all that is needed to restore proper functioning.
By following these steps to remove the wheel and access the brake drum, you are now one step closer to effectively cleaning away the rust and restoring the performance of your brake system. Remember, safety is paramount throughout this process, so always take the necessary precautions and refer to your vehicle’s manual if needed.
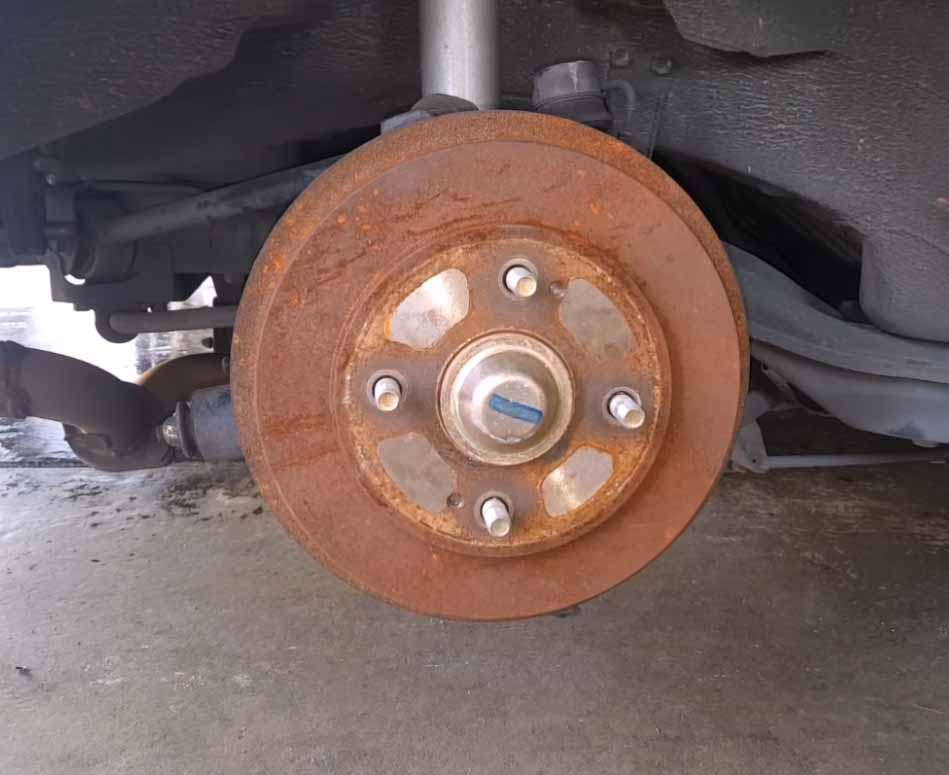
Step 3: Inspecting the brake drum for rust and damage
Before proceeding with the cleaning process, it is crucial to thoroughly inspect the brake drum for any signs of rust or damage. Rust not only affects the braking performance but also compromises the overall safety of your vehicle. Here’s a step-by-step guide on how to inspect the brake drum for rust and damage:
- Start by visually examining the outer surface of the brake drum. Look for any visible signs of rust, such as reddish-brown patches or flaking metal. Pay close attention to the edges and the area where the brake shoes make contact with the drum.
- Use a flashlight to inspect the inner surface of the brake drum. Rotate the drum to get a comprehensive view. Look for any deep pitting, grooves, or cracks. These can indicate severe damage and may require professional intervention or even drum replacement.
- Check the brake drum’s thickness using a brake drum micrometer or a suitable measuring tool. Refer to the manufacturer’s specifications to ensure it meets the minimum thickness requirement. Excessive wear can reduce the braking efficiency and jeopardize your safety on the road.
- Pay attention to the drum’s overall condition. Look for signs of warping or uneven wear. A warped brake drum can cause vibrations or pulsations while braking, leading to an uncomfortable driving experience.
- Inspect the mounting surfaces and bolt holes for any signs of damage or wear. Ensure that the drum is securely attached to the wheel hub and there is no excessive play or movement.
By thoroughly inspecting the brake drum for rust and damage, you can identify any potential issues that may affect the cleaning process or require further attention. If you notice significant rust or extensive damage, it is advisable to consult a professional mechanic to assess the situation and recommend the appropriate course of action. Remember, ensuring the integrity of your brake system is essential for a safe and smooth driving experience.
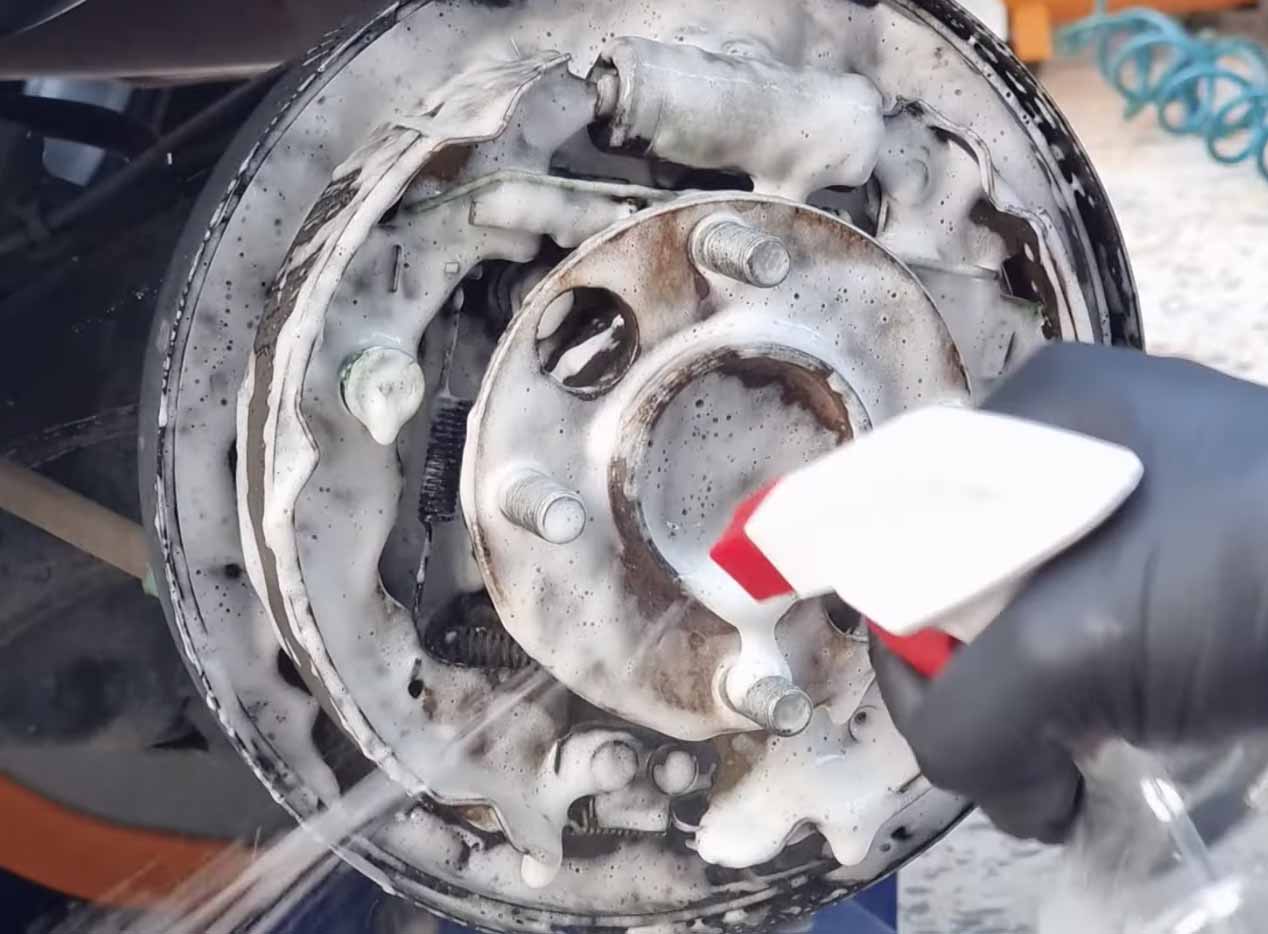
Step 4: Cleaning the brake drum using a wire brush and rust dissolver
After removing the brake drum from the vehicle, it’s time to tackle the rust that has accumulated on its surface. Step 4 involves cleaning the brake drum thoroughly using a wire brush and rust dissolver to restore its optimal functionality.
Start by inspecting the drum for any obvious signs of damage or excessive rust. If there are any deep grooves or cracks present, it might be necessary to replace the drum altogether. However, if the damage is minimal and the drum is salvageable, proceed with the cleaning process.
Begin by using a wire brush to scrub away loose rust and debris from the surface of the drum. Make sure to pay extra attention to the inner and outer edges, as rust tends to accumulate more in these areas. The wire brush will help remove the surface rust and prepare the drum for further cleaning.
Next, apply a rust dissolver solution to the drum. Rust dissolvers are specifically designed to break down and remove stubborn rust. Follow the instructions provided by the manufacturer and ensure that the solution is evenly applied to the entire surface of the drum. Allow the rust dissolver to sit for the recommended amount of time to effectively penetrate the rust.
Once the rust dissolver has had time to work its magic, use the wire brush again to scrub away any remaining rust residue. This step may require a bit of elbow grease, especially if the rust is particularly stubborn. Be thorough in your efforts to ensure that all traces of rust are eliminated.
After the drum has been thoroughly cleaned, rinse it with water to remove any residual rust dissolver or loose debris. Dry the drum completely using a clean cloth or compressed air to prevent any moisture from causing further corrosion.
By cleaning the brake drum using a wire brush and rust dissolver, you are effectively removing the rust and restoring its optimal condition. This step is crucial in reviving your brake system and ensuring smooth and efficient braking performance.
Please note that if you are unsure or uncomfortable performing these steps yourself, it is always recommended to consult a professional mechanic for assistance.
Step 5: Applying anti-seize compound and brake cleaner
After thoroughly cleaning the rust off your brake drum, it’s time to protect it from future corrosion and ensure smooth functioning. Step 5 involves applying an anti-seize compound and brake cleaner to enhance the performance and longevity of your brake system.
First, start by applying a thin layer of anti-seize compound to the contact surfaces of the brake drum. This compound acts as a protective barrier, preventing rust formation and reducing friction between the drum and the brake shoes.
Make sure to only apply a thin layer, as excessive application can lead to a buildup that may interfere with the brake system’s operation. Use a clean, lint-free cloth or a small brush to evenly distribute the compound on the drum’s surfaces.
Once the anti-seize compound is applied, it’s time to use brake cleaner to remove any residual dirt, grease, or contaminants. Brake cleaner is specifically formulated to dissolve brake dust, oil, and other substances that can compromise the braking performance.
Spray the brake cleaner generously on the drum’s surface, ensuring that it reaches all areas. Pay particular attention to the contact areas between the drum and the brake shoes. Allow the cleaner to sit for a few minutes to effectively dissolve any residue.
Afterward, use a clean cloth or a soft-bristled brush to gently scrub the drum, removing any loosened dirt or grime. Make sure to clean both the inner and outer surfaces of the drum thoroughly.
Once the cleaning process is complete, allow the drum to air dry completely before reassembling the brake system. This will ensure that no moisture remains, reducing the risk of rust formation.
By applying an anti-seize compound and using brake cleaner, you have taken an essential step in reviving your brake system. These measures will not only help prevent rust but also contribute to smoother braking, improved performance, and enhanced safety on the road.
Step 6: Reassembling the brake components and adjusting the drum brakes
Once you have successfully cleaned the brake drum and inspected all the components, it’s time to reassemble everything and make the necessary adjustments to ensure optimal performance of your drum brakes.
Start by carefully placing the cleaned brake shoes back onto the brake assembly. Make sure they are correctly aligned with the anchor pin and the wheel cylinder. Once in place, secure them using the retaining springs or clips, ensuring a snug fit.
Next, reattach the adjuster mechanism to the brake shoes. This mechanism is responsible for adjusting the brake shoes as they wear down over time. Be sure to properly position and connect the adjuster lever and spring to the brake shoes.
Once the adjuster mechanism is in place, you can proceed to install the brake drum. Carefully slide the drum over the brake shoes, ensuring it sits flush against the wheel hub. If there is any resistance or difficulty in fitting the drum, double-check the alignment of the brake shoes and adjust them if necessary.
With the drum in place, it’s time to adjust the drum brakes. This step is crucial to ensure proper braking performance and prevent uneven wear. Start by rotating the drum and adjusting the star wheel adjuster until you feel a slight drag when spinning the drum. This indicates that the shoes are making contact with the drum.
To fine-tune the adjustment, use a brake adjustment tool or a flathead screwdriver to turn the star wheel adjuster. Make small adjustments, testing the drum’s rotation after each turn until you achieve the desired level of braking resistance.
Once you are satisfied with the adjustment, repeat the process on the other side of the vehicle, ensuring symmetrical braking.
Lastly, double-check all connections, bolts, and fasteners to ensure everything is securely tightened. Take a moment to inspect the entire brake system for any signs of damage or wear that may require further attention.
By following these step-by-step instructions and taking the time to properly reassemble and adjust your drum brakes, you can revive your brake system and ensure safe and efficient braking performance.
Tips for preventing future brake drum rust and maintaining optimal braking performance
Preventing future brake drum rust is crucial to ensure optimal braking performance and extend the lifespan of your brake system. Here are some valuable tips to help you maintain the integrity of your brake drums and keep rust at bay.
- Regular Cleaning: Make it a habit to clean your brake drums regularly. This will help remove any dirt, debris, or corrosive substances that can contribute to rust formation. Use a mild soap and water solution, along with a soft brush or cloth, to gently scrub the surface of the drum.
- Dry Thoroughly: After cleaning, ensure that the brake drums are completely dry before reassembling the braking system. Moisture can accelerate rusting, so take the time to dry the drums thoroughly using a clean, lint-free cloth.
- Apply a Protective Coating: Consider applying a rust-resistant coating to the brake drums after cleaning. There are various products available on the market specifically designed to inhibit rust formation. Follow the manufacturer’s instructions carefully to ensure proper application and effectiveness.
- Avoid Excessive Moisture Exposure: Whenever possible, avoid exposing your brake drums to excessive moisture. If you live in an area with high humidity or experience frequent rainfall, take extra precautions to keep your brake system dry. This might include parking your vehicle in a covered area or using protective covers for your brake drums.
- Inspect and Replace Damaged Parts: Regularly inspect your brake system for any signs of damage, such as worn-out brake shoes or leaking brake fluid. These issues can contribute to rust formation and compromise braking performance. Replace any damaged parts promptly to maintain the effectiveness of your braking system.
- Follow Proper Storage Practices: If you’re storing a vehicle or its brake drums for an extended period, take proper precautions to prevent rust. Thoroughly clean the drums, apply a protective coating, and store them in a dry, climate-controlled environment. Additionally, consider rotating the drums periodically to prevent flat spots and ensure even exposure to air.
By implementing these preventative measures, you can significantly reduce the risk of brake drum rust and maintain optimal braking performance. Remember, a well-maintained brake system not only ensures your safety but also enhances the overall driving experience.
We hope you found our step-by-step guide to cleaning brake drum rust helpful in reviving your brake system. Rusty brake drums can compromise the safety and performance of your vehicle, but with the right techniques and tools, you can restore them to optimal condition. By following the steps outlined in our blog post, you’ll be able to effectively remove rust and ensure your brakes are working at their best. Remember, safety should always be a top priority when working on your vehicle’s brake system. Happy driving and enjoy the smooth, reliable braking experience!