A misaligned bumper can be a frustrating and unsightly problem for car owners. Whether it’s from a minor fender bender or just general wear and tear, a bumper that doesn’t sit properly can detract from the overall appearance of your vehicle. Fortunately, fixing a misaligned bumper is not as difficult as you might think, and with a few simple tools and techniques, you can have it looking as good as new in no time. In this blog post, we will guide you through the process of repairing a misaligned bumper step-by-step. From assessing the damage and determining the cause, to removing and realigning the bumper, we’ll cover everything you need to know to get your car looking great again. So, let’s get started!
Introduction to bumper misalignment issues
One of the most common issues car owners face is a misaligned bumper. Whether it’s a minor fender bender or a parking mishap, a misaligned bumper can be an eyesore and negatively impact the overall appearance of your vehicle. Not only does it compromise the aesthetic appeal, but it can also affect the functionality and safety of your car.
Bumper misalignment occurs when the bumper is not properly aligned with the rest of the vehicle’s body. This can result in uneven gaps, crooked edges, or a bumper that sits too high or too low. It can be caused by various factors such as collisions, rough driving conditions, or even natural wear and tear over time.
Besides the obvious visual imperfections, a misaligned bumper can also affect the performance of your vehicle. It may impact the aerodynamics, which can lead to reduced fuel efficiency. Additionally, if the misalignment is severe, it can interfere with the proper functioning of sensors and other safety features integrated into the bumper.
Fortunately, fixing a misaligned bumper is a task that can be tackled by car owners with basic DIY skills. In this comprehensive guide, we will walk you through the step-by-step process of fixing a misaligned bumper, providing you with the knowledge and techniques needed to restore your bumper to its original position.
Before diving into the repair process, it’s important to assess the extent of the misalignment. Minor misalignments can often be easily fixed, while more severe cases may require professional assistance. So, let’s get started on this bumper repair journey and bring back the flawless appearance and functionality to your vehicle!

Assessing the severity of the misalignment
Before diving into fixing a misaligned bumper, it is crucial to assess the severity of the misalignment. This step will help you determine the appropriate course of action and whether you can tackle the repair yourself or if professional assistance is required.
First, take a close look at the bumper and observe any visible signs of damage. Check for cracks, dents, or scratches that may have contributed to the misalignment. Additionally, inspect the surrounding areas, such as the grille or headlights, to ensure they are undamaged.
Next, examine the bumper’s alignment in relation to the rest of the vehicle. Is it slightly off-center or significantly shifted? Look for any noticeable gaps or unevenness between the bumper and the body of the car. Take note of any areas where the misalignment is particularly prominent.
Consider the functionality of the bumper. Does it affect the opening and closing of doors or hinder the proper functioning of other car components? If the misalignment compromises the functionality of the bumper or poses safety risks, it is advisable to seek professional assistance.
Lastly, assess your skills and experience with car repairs. If you have ample knowledge and confidence in your abilities, you may choose to fix minor misalignments on your own. However, for more complex or severe misalignments, it is wise to consult with an automotive professional who has the expertise and specialized tools necessary for a proper repair.
By thoroughly assessing the severity of the misalignment, you can make an informed decision on the best approach to fixing your bumper. Remember, safety should always be a top priority, so if in doubt, seek professional guidance to ensure a safe and effective repair.
Tools and materials needed for the repair
Before diving into the process of fixing a misaligned bumper, it’s essential to gather all the necessary tools and materials. Having these on hand will ensure a smooth and efficient repair process. Here are the tools and materials you’ll need:
- Socket Set: A socket set with various sizes of sockets and a ratchet will be essential for removing bolts and screws holding the bumper in place.
- Screwdriver Set: A set of screwdrivers, including both flathead and Phillips head, will be needed to remove any screws or fasteners securing the bumper.
- Trim Removal Tools: These specialized tools are designed to remove clips and fasteners without damaging the surrounding trim or panels. They come in various shapes and sizes to accommodate different types of clips.
- Pry Bar: In some cases, a pry bar or a large flathead screwdriver may be necessary to gently pry the bumper away from the car’s body.
- Torque Wrench: If you need to tighten any bolts or screws during the reinstallation process, a torque wrench will ensure that they are tightened to the manufacturer’s recommended specifications.
- Rubber Mallet: A rubber mallet can be useful for gently tapping the bumper into alignment without causing any damage.
- Level: To ensure that the bumper is aligned properly, a level can be helpful to check for evenness and symmetry.
- Safety Equipment: Don’t forget to prioritize your safety. Wear protective gloves to prevent any injuries while working with tools. Safety glasses should also be worn to protect your eyes from any debris or particles.
In addition to these tools, you may also need some materials such as replacement clips or screws if any are damaged or missing. It’s a good idea to inspect the bumper and make a note of any missing or broken parts before starting the repair process. By having all the necessary tools and materials ready, you’ll be well-prepared to tackle the task of fixing a misaligned bumper effectively.
Step-by-step guide to fixing a misaligned bumper
If you’ve noticed that your car’s bumper is misaligned, don’t worry! It’s a common issue that can be easily fixed with a few simple steps. Here is a step-by-step guide to help you fix a misaligned bumper:
Step 1: Assess the misalignment
The first thing you need to do is assess the extent of the misalignment. Take a close look at the bumper and determine if it is misaligned vertically, horizontally, or both. This will help you understand the exact nature of the problem and guide your repair process.
Step 2: Loosen the fasteners
To begin the repair, you’ll need to loosen the fasteners that hold the bumper in place. These fasteners are usually located underneath the bumper or inside the trunk. Use the appropriate tools, such as a socket wrench or screwdriver, to carefully remove the fasteners without causing any damage.
Step 3: Align the bumper
Once the fasteners are loosened, you can start aligning the bumper. Gently push or pull the bumper in the desired direction to achieve the correct alignment. Take your time and make small adjustments until the bumper is properly aligned with the rest of the car’s body.
Step 4: Tighten the fasteners
Once the bumper is aligned, it’s time to tighten the fasteners back into place. Use your tools to firmly secure the bumper, ensuring that it stays in its correct position. Be careful not to overtighten the fasteners, as this can cause damage to the bumper or the car’s body.
Step 5: Test the alignment
After tightening the fasteners, step back and visually inspect the bumper’s alignment. If it looks aligned and sits flush with the rest of the car’s body, gently push on the bumper to ensure it is securely in place. If everything feels and looks good, then congratulations – you’ve successfully fixed a misaligned bumper!
Remember, if you’re unsure about tackling this repair yourself, it’s always best to seek professional help. A qualified auto body technician can ensure that the bumper is properly aligned and that all necessary repairs are done correctly.
By following this step-by-step guide, you can save time and money by fixing a misaligned bumper on your own. With a little patience and effort, your car will look as good as new!
Preparing the work area
Before diving into the process of fixing a misaligned bumper, it is crucial to prepare the work area properly. This step is often overlooked but plays a significant role in ensuring a successful repair.
Firstly, find a spacious and well-lit area to work in. This will provide you with enough room to maneuver and allow for better visibility, making the process easier and safer. It is recommended to work outdoors or in a well-ventilated garage to avoid inhaling any fumes from the materials used during the repair.
Next, gather all the necessary tools and materials. These may include a socket set, wrenches, pliers, a pry bar, a rubber mallet, sandpaper, a degreaser, masking tape, and a bumper repair kit. Having everything within reach will save you time and prevent any unnecessary interruptions during the repair process.
Clean the bumper thoroughly before starting any repairs. Use a degreaser to remove any dirt, grime, or grease from the surface. This will ensure proper adhesion of any repair materials you apply later on.
Once the bumper is clean, protect the surrounding areas from accidental damage. Use masking tape to cover any adjacent panels, lights, or trim pieces that could be potentially scratched or damaged during the repair.
Lastly, inspect the misaligned bumper closely to identify any underlying issues. Look for any broken clips, bolts, or brackets that may need to be replaced. Taking note of these issues beforehand will allow you to address them during the repair process.
By preparing the work area diligently, you are setting yourself up for a smoother and more efficient bumper repair. It may seem like a simple step, but it is crucial in achieving professional results and ensuring the longevity of the repair.
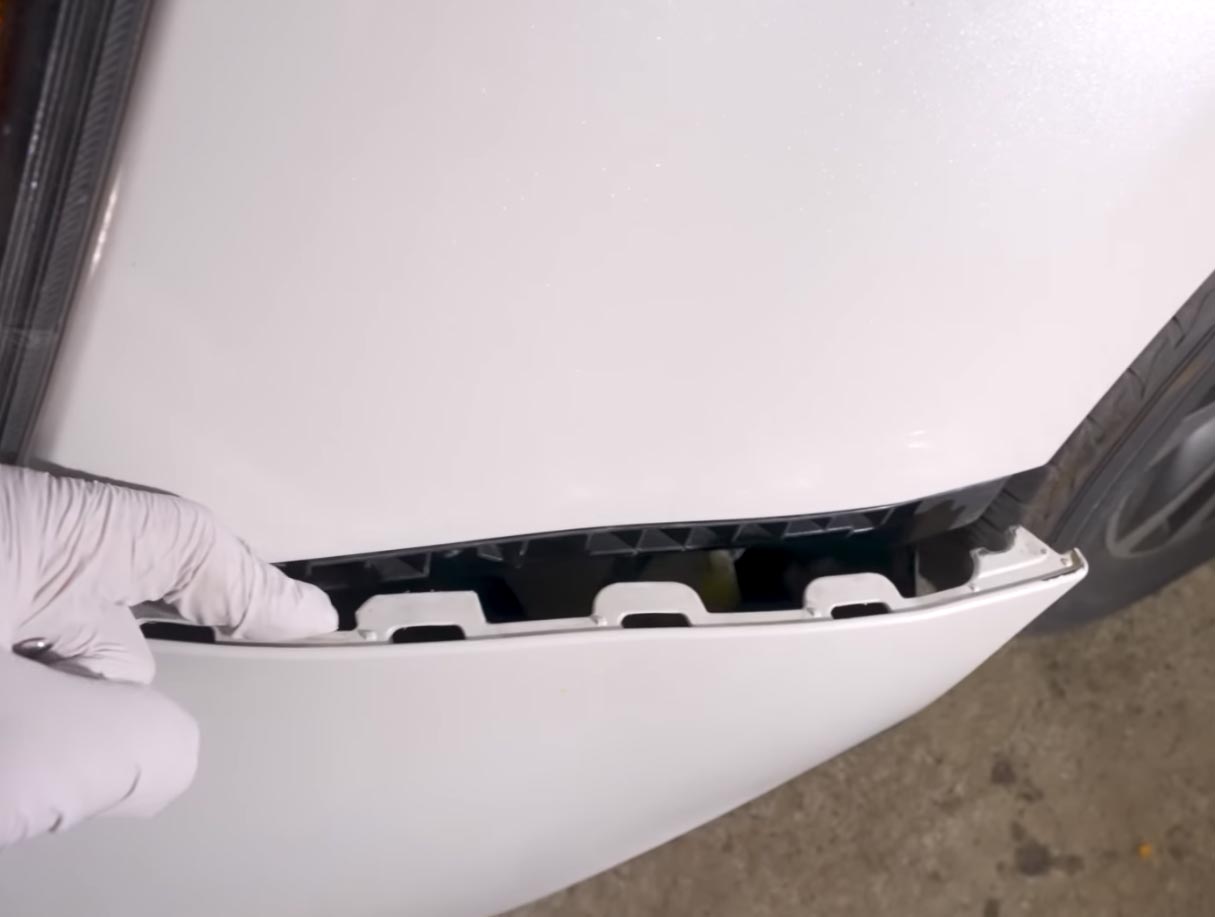
Loosening the bumper bolts or clips
When it comes to fixing a misaligned bumper, one of the first steps you need to take is loosening the bumper bolts or clips. These bolts or clips hold the bumper in place, and by loosening them, you can gain better access to the areas that need adjustment.
To begin, locate the bumper bolts or clips underneath the bumper. Depending on your vehicle’s make and model, there may be a series of bolts or clips evenly spaced along the underside of the bumper. You may need to use a socket wrench or a screwdriver to remove these bolts or clips.
Carefully loosen each bolt or clip one at a time, ensuring not to remove them completely. Loosening them gradually will allow you to maintain control over the bumper while making adjustments.
Once all the bolts or clips are loosened, you can start making the necessary adjustments to realign the bumper. Gently push or pull the bumper into the desired position, taking care not to apply excessive force that could cause damage.
After making the adjustments, double-check the alignment to ensure it looks straight and even. If needed, you can make additional tweaks until you are satisfied with the bumper’s position.
Once you have achieved the desired alignment, it’s time to tighten the bolts or clips back into place. Use your socket wrench or screwdriver to secure each bolt or clip, making sure they are snug but not overly tightened.
By properly loosening the bumper bolts or clips, you can effectively make adjustments to fix a misaligned bumper. However, if you encounter any difficulties or if the misalignment is severe, it is recommended to seek professional assistance from a qualified auto body repair technician.
Adjusting the bumper position
Adjusting the bumper position is a crucial step in fixing a misaligned bumper. It requires careful attention to detail and a systematic approach to ensure the best results. Here’s a step-by-step guide on how to adjust the position of your bumper.
- Assess the misalignment: Before you begin adjusting the bumper, thoroughly examine the misalignment and note the specific areas that need to be corrected. This will help you determine the extent of the adjustment required and plan your approach accordingly.
- Loosen mounting bolts: Most bumpers are attached to the vehicle using mounting bolts. Locate these bolts and use appropriate tools to loosen them. Be careful not to remove the bolts completely, as you will need them to secure the bumper in its new position later.
- Align the bumper: Gently push or pull the bumper into the desired position. Take your time to ensure that it aligns properly with the surrounding body panels. Use a tape measure or visual cues to ensure symmetry and alignment with the vehicle’s frame.
- Secure the bumper: Once you have achieved the desired position, tighten the mounting bolts gradually. Start with the innermost bolts and work your way outward. This will help maintain the alignment as you secure the bumper in place. Use a torque wrench to ensure the bolts are tightened to the manufacturer’s specifications.
- Test the alignment: After securing the bumper, step back and visually inspect the alignment. Check for any remaining gaps or inconsistencies. Gently push on the bumper to ensure it is securely attached and does not move or shift. If necessary, make minor adjustments to achieve a perfect fit.
- Finishing touches: Once the bumper is properly aligned, check for any scratches, dents, or paint damage that occurred during the adjustment process. Depending on the severity, you may need to touch up the paint or consult a professional for repairs.
Remember, adjusting the position of a bumper requires patience and precision. If you are unsure or uncomfortable with the process, it is always best to seek the assistance of a professional auto body technician who can ensure proper alignment and a seamless repair.
Tightening the bolts or clips
Tightening the bolts or clips is a crucial step in fixing a misaligned bumper. After identifying the misalignment and adjusting the bumper back into its proper position, it’s important to ensure that it is securely fastened in place. This can be achieved by tightening the bolts or clips that hold the bumper in position.
To begin, locate the bolts or clips that secure the bumper to the vehicle’s frame or support brackets. Using the appropriate tools such as a wrench or socket set, carefully tighten each bolt or clip to the manufacturer’s recommended torque specifications. It’s important not to overtighten, as this can cause damage to the bumper or surrounding components.
While tightening the bolts, it’s a good idea to check for any signs of wear or damage. If any bolts are stripped or damaged, they should be replaced with new ones to ensure a secure fit. Additionally, inspect the clips for any signs of weakness or breakage. If any clips are damaged, they should be replaced as well.
After tightening all the bolts or clips, double-check the alignment of the bumper. Gently push and pull on the bumper to ensure it is securely in place and doesn’t move or shift. If needed, make further adjustments and repeat the tightening process until the bumper is properly aligned and firmly attached.
By properly tightening the bolts or clips, you can ensure that the misaligned bumper is securely fixed in place, restoring both the appearance and functionality of your vehicle’s front or rear end. Remember to follow the manufacturer’s guidelines and take your time to achieve the best results possible.
Checking for proper alignment
Checking for proper alignment is a crucial step in fixing a misaligned bumper. Once you have removed any visible damage or dents, it’s time to ensure that the bumper is aligned correctly. This step is essential to ensure that the repaired bumper not only looks good but also functions properly.
Start by visually inspecting the bumper from different angles. Look for any noticeable gaps or asymmetry between the bumper and the adjacent body panels. If there are any gaps or misalignments, it’s a clear indication that further adjustments are needed.
Next, get up close and personal with the bumper. Run your hands along the edges and corners to feel for any irregularities or discrepancies. Pay attention to any areas that may be sticking out or not flush with the rest of the body. These deviations indicate misalignment and will need to be addressed.
To further assess the alignment, you can use a measuring tape or a straight edge tool. Measure the distance between the bumper and specific reference points on the vehicle, such as the headlights or fenders. Compare these measurements to the manufacturer’s specifications to ensure accuracy.
Additionally, check the bumper’s alignment in relation to the rest of the vehicle. Stand back and observe if the bumper appears to be parallel to the ground and aligned symmetrically with the overall body of the car. Any noticeable tilts or unevenness should be corrected.
Once you have identified any misalignments or discrepancies, it’s time to make the necessary adjustments. Depending on the severity of the misalignment, you may be able to realign the bumper manually or with the help of specialized tools. In more complex cases, professional assistance may be required to ensure a precise alignment.
Remember, proper alignment is not just about aesthetics; it also impacts the bumper’s functionality and overall safety. Taking the time to thoroughly check for proper alignment will ensure that your bumper repair is successful and that your vehicle looks and performs its best.
Making final adjustments if necessary
Making final adjustments if necessary is an important step in fixing a misaligned bumper. Once you have followed all the previous steps and have aligned the bumper to the best of your ability, it’s time to assess if any further adjustments are needed.
Start by taking a step back and visually inspecting the bumper from different angles. Look for any gaps or inconsistencies in the alignment. If you notice any areas that still appear misaligned, it’s time to make some final adjustments.
One method to make these adjustments is by using a rubber mallet or a soft-faced hammer. Gently tap on the misaligned area of the bumper to nudge it into the correct position. Be careful not to use excessive force, as this can cause damage to the bumper or surrounding parts.
Another technique is to use a heat gun or hairdryer to warm up the bumper’s plastic material. This will make it more pliable and easier to manipulate. Once heated, apply gentle pressure to the misaligned area and mold it into the desired position. Remember to wear protective gloves to avoid burning your hands.
If the bumper still doesn’t align properly, you may need to readjust the brackets or mounting points. This might involve loosening screws or bolts and moving the bumper slightly. Take your time and make small adjustments, checking the alignment after each one.
Once you are satisfied with the alignment, tighten all the screws or bolts securely. Double-check that everything is securely in place and that the bumper is aligned correctly.
Remember, if you are unsure about making these final adjustments yourself, it’s always best to consult a professional. They have the expertise and experience to ensure that your bumper is fixed properly and safely.
By making these final adjustments, you can achieve a perfectly aligned bumper, restoring the aesthetic appeal of your vehicle and ensuring its structural integrity.
Dealing with more complex misalignment cases
Sometimes, misaligned bumpers can be more complex to fix than just a simple adjustment. In these cases, it’s important to assess the extent of the damage and determine the best course of action. Here are some tips for dealing with more complex misalignment cases:
- Assess the damage: Start by thoroughly examining the bumper to identify any underlying issues. Look for any cracks, dents, or structural damage that may be contributing to the misalignment.
- Use a heat gun: If the bumper is made of plastic, a heat gun can be used to soften the material and make it more pliable. Gently apply heat to the affected area, being careful not to overheat or damage the bumper.
- Apply pressure: Once the plastic is heated, you can gently push or pull on the bumper to realign it. Use steady and controlled pressure, being cautious not to apply too much force and cause further damage.
- Consider reinforcement: In cases where the misalignment is due to structural damage, additional reinforcement may be necessary. This can involve using adhesive or bonding agents, or even adding support brackets to ensure the bumper stays in place.
- Seek professional help: If you’re unsure about tackling a complex misalignment on your own, it’s best to seek the help of a professional. A skilled bumper repair technician will have the expertise and specialized tools needed to properly realign and fix the bumper.
Remember, dealing with more complex misalignment cases may require a higher level of skill and expertise. If you’re not confident in your abilities or the damage seems extensive, it’s always best to consult a professional to ensure the repair is done correctly and safely.
DIY vs. professional repair: When to seek professional help
When it comes to fixing a misaligned bumper, you may be faced with the decision of whether to tackle the repair yourself or seek professional help. While there are certain advantages to both options, it’s essential to assess the severity of the damage and your own skill level before making a decision.
For minor misalignment issues or superficial scratches, a DIY approach can be a cost-effective solution. With the right tools and a detailed guide, you may be able to realign the bumper and restore its appearance on your own. This can save you money and give you a sense of accomplishment.
However, it’s important to recognize the limits of your expertise. If the misalignment is severe, there are structural issues, or if the bumper has sustained significant damage, it’s advisable to seek professional help. Certified technicians have the knowledge, experience, and specialized equipment to address complex repairs effectively. They can ensure that the repairs are done correctly, restoring both the appearance and functionality of your bumper.
Moreover, professional repair services often come with warranties, providing you with added peace of mind. This means that if any issues arise after the repair, you can rely on the expertise of the professionals to rectify the problem without any additional cost.
Ultimately, the decision of whether to pursue a DIY repair or seek professional help depends on several factors, including the extent of the damage, your skill level, and your budget. It’s crucial to be realistic about your abilities and prioritize safety. If you’re unsure about the complexity of the repair or lack the necessary tools and expertise, it’s best to leave it in the hands of professionals who can ensure a thorough and reliable fix.
Tips for preventing bumper misalignment in the future
Preventing bumper misalignment in the future is crucial to maintaining the overall appearance and functionality of your vehicle. Here are some valuable tips to help you avoid this common issue:
- Be mindful of parking: When parking your vehicle, try to choose spots with ample room and avoid parking too close to other cars or obstacles. This reduces the risk of accidental bumps or scrapes that can cause bumper misalignment.
- Avoid rough driving: Aggressive driving, off-road adventures, and rough terrain can put excessive strain on your vehicle’s suspension system, which may lead to bumper misalignment. Drive carefully and avoid rough roads whenever possible.
- Maintain a safe distance: Keep a safe distance from the vehicle in front of you to allow for sudden stops or unexpected maneuvers. This minimizes the risk of rear-end collisions that can result in bumper damage and misalignment.
- Regular inspections: Periodically inspect your bumper for any signs of damage or misalignment. Look for gaps between the bumper and the body of the car, uneven alignment, or loose screws. Catching these issues early can save you from more extensive repairs in the future.
- Professional installation: If you need to replace or repair your bumper, always opt for professional installation. Certified technicians have the expertise and knowledge to ensure proper alignment and secure attachment, reducing the likelihood of future misalignment.
- Protective measures: Consider installing bumper guards or protective films to add an extra layer of defense against scratches, dings, and misalignment. These accessories can absorb impact and protect your bumper during low-speed collisions or parking mishaps.
By implementing these preventive measures, you can significantly reduce the chances of bumper misalignment and keep your vehicle looking pristine for a longer time. Remember, a well-maintained bumper not only enhances the aesthetics of your car but also plays a crucial role in ensuring its structural integrity and safety.
Frequently asked questions about bumper repair
When it comes to bumper repair, there are often a lot of questions that arise. To help you navigate through the process, we have compiled a list of frequently asked questions about bumper repair.
- Can I fix a misaligned bumper on my own?
While some minor misalignments can be fixed at home, it is recommended to seek professional help for more significant damage. A professional will have the necessary tools and expertise to ensure the bumper is properly aligned and functions as intended. - How much does it cost to repair a misaligned bumper?
The cost of bumper repair varies depending on the extent of the damage and the make and model of your vehicle. Minor misalignments may be fixed for a few hundred dollars, while more severe damage can cost upwards of several thousand dollars. It is best to consult with a reputable repair shop to get an accurate estimate for your specific situation. - How long does the repair process take?
The time required to fix a misaligned bumper will depend on the severity of the damage and the availability of parts. In some cases, a minor misalignment can be fixed within a few hours, while more extensive repairs may take several days. It is advisable to discuss the timeline with your chosen repair shop beforehand. - Will my insurance cover the cost of bumper repair?
If you have comprehensive or collision coverage, your insurance may cover the cost of bumper repair, subject to deductibles and policy limits. It is essential to contact your insurance provider to understand your coverage and any potential out-of-pocket expenses. - Can a misaligned bumper affect the overall safety of my vehicle?
Yes, a misaligned bumper can compromise the safety and functionality of your vehicle. Bumpers are designed to absorb impact and protect the occupants in the event of a collision. A misaligned bumper may not provide the same level of protection, and it could affect other components, such as sensors or lights.
Remember, it is always best to consult with a professional repair technician to assess the damage and determine the appropriate course of action for your specific situation. They will have the knowledge and experience to ensure your bumper is repaired correctly and your vehicle is safe to drive.
Conclusion and final thoughts on bumper repair
In conclusion, repairing a misaligned bumper is a task that can be accomplished with some patience and the right tools. While it may seem like a daunting task at first, following the step-by-step process outlined in this guide can help you restore your bumper to its original position.
Remember to assess the damage before beginning any repairs and determine whether it is something you can handle on your own or if it requires professional assistance. Safety should always be a priority, so if you are unsure or uncomfortable with any part of the repair process, it is best to seek expert help.
Additionally, it is important to note that bumper repair techniques may vary depending on the make and model of your vehicle. Always consult your vehicle’s manual or reach out to a trusted mechanic if you have any doubts or concerns.
Taking care of your vehicle’s bumper not only enhances its appearance but also ensures the safety and functionality of your car. Regular maintenance and prompt repairs are key to preserving the overall condition of your vehicle.
Lastly, it is worth mentioning that prevention is often the best approach when it comes to bumper damage. Taking proactive measures such as avoiding tailgating, parking carefully, and investing in bumper protectors can significantly reduce the risk of misalignment or other types of damage.
By following the tips and techniques provided in this guide, you can become well-equipped to handle bumper misalignment issues and preserve the overall value and aesthetics of your vehicle. Remember, a well-maintained bumper not only protects your car but also leaves a positive impression on others.
We hope you found our blog post on bumper repair helpful and informative. Fixing a misaligned bumper may seem like a daunting task, but with the step-by-step guide we provided, you can tackle it with confidence. Remember to take your time, follow the instructions carefully, and use the right tools to ensure a successful repair. By following these tips, you’ll be able to restore your bumper to its original alignment, saving you time and money on professional repairs. Happy fixing!